
Audio is one of the most important parts of video editing, yet many beginners focus only on visuals and completely ignore sound quality. A video with average visuals but clean and clear audio usually feels much more professional than a visually stunning video with poor sound. Whether you create YouTube videos, cinematic edits, gaming content, tutorials, interviews, podcasts, reels, or travel videos, audio quality directly affects viewer experience. Adobe Premiere Pro includes powerful built-in audio tools that help creators improve sound without needing expensive external software. One of the most beginner-friendly and useful tools inside Premiere Pro is the Essential Sound Panel. This feature simplifies audio editing and allows even beginners to create professional sound improvements quickly. In this guide, we will learn how the Essential Sound Panel works, how to clean audio, reduce noise, improve voice quality, add music balance, and create professional sound design for videos.
When beginners first import clips into Premiere Pro, they usually place everything into the timeline and start editing visuals immediately. However, professional editors always pay attention to audio organization from the beginning. Dialogue, music, sound effects, and ambient sounds should all remain organized because clean workflow saves time later.
Premiere Pro allows editors to separate audio tracks and label them properly inside the timeline. Many professionals keep dialogue on one track, background music on another, and sound effects on separate layers.
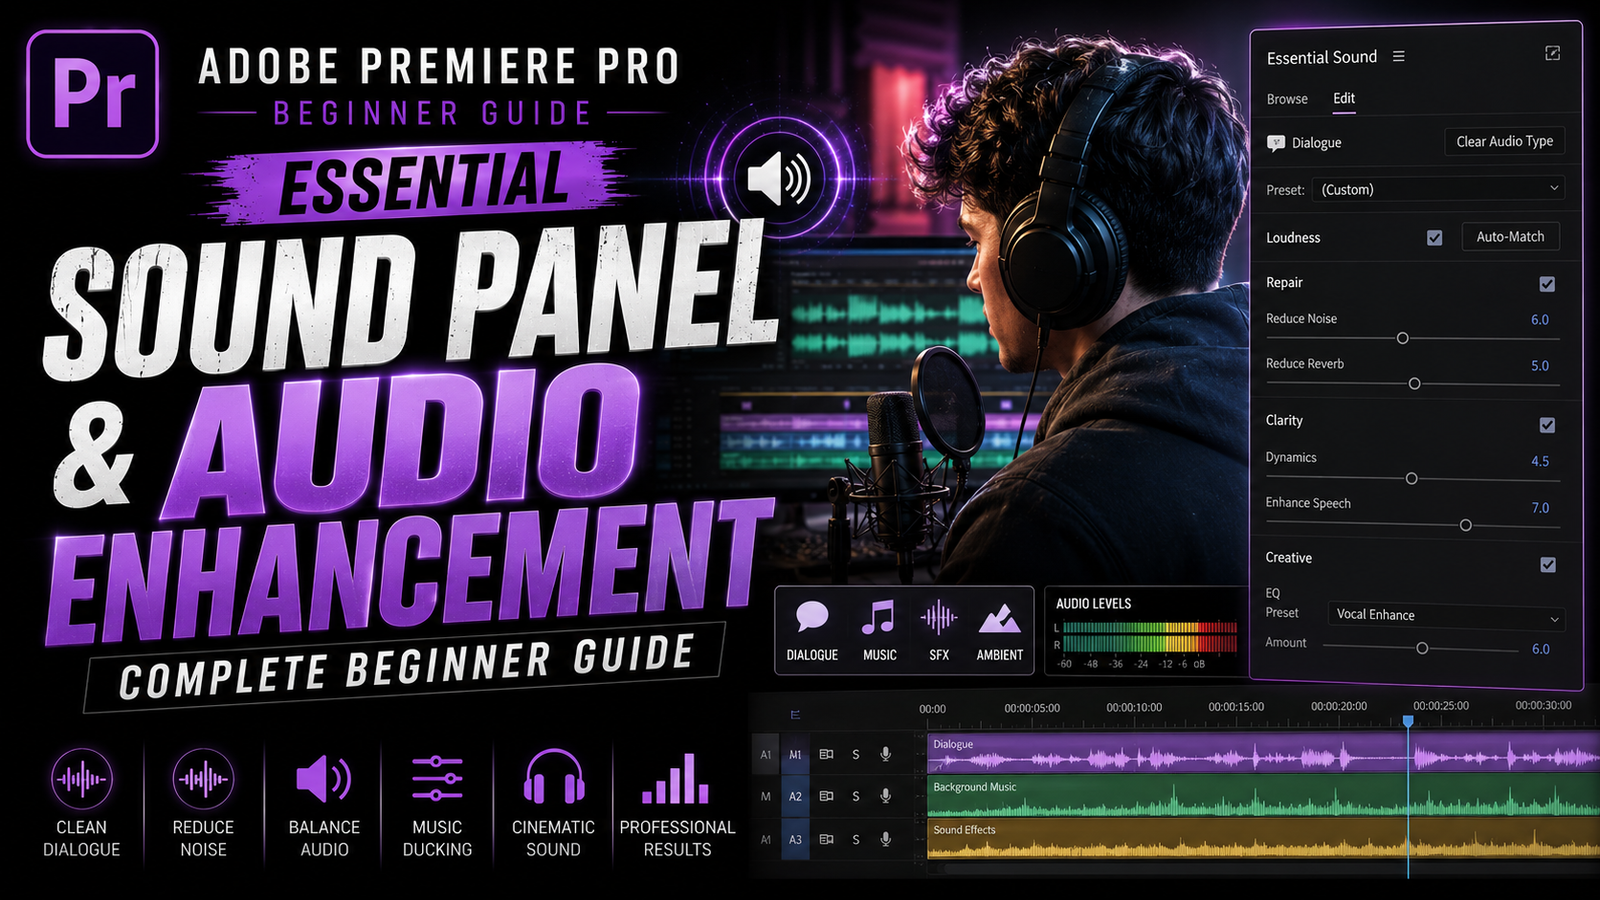
The Essential Sound Panel is designed to make audio editing easier by categorizing sound into simple sections such as Dialogue, Music, SFX, and Ambient. To open it, go to Window and enable Essential Sound. Once the panel appears, select an audio clip from the timeline and assign it to one of the categories. This instantly unlocks specialized controls designed for that type of sound.
🎬 Understanding the Essential Sound Panel
Dialogue is usually the most important audio element because viewers need to hear voices clearly. After assigning a clip as Dialogue, Premiere Pro provides tools such as Loudness, Repair, Clarity, and Creative controls. Loudness automatically balances audio levels to industry standards, helping voices sound more consistent. Beginners often struggle with clips recorded at different volumes, but Loudness correction helps fix this quickly.
The Repair section becomes extremely useful for cleaning bad recordings. Features like Reduce Noise and Reduce Reverb help remove unwanted background sounds and echo. For example, if a video was recorded in a noisy room or outdoor environment, reducing noise can improve clarity significantly.
However, beginners should avoid using extreme values because too much noise reduction can make voices sound robotic and unnatural. Small adjustments usually create cleaner and more professional results.Clarity controls improve speech quality further by enhancing vocal presence and sharpness. This helps dialogue cut through background music more effectively. Many YouTubers and podcasters rely on these tools because clear speech keeps viewers engaged and improves overall content quality.
⚡ Cleaning Audio & Voice Enhancement
Music is another major part of modern editing. Background music creates mood, emotion, and pacing for videos. However, one of the biggest beginner mistakes is making music too loud. If viewers cannot hear dialogue properly because of background music, the viewing experience becomes frustrating. Premiere Pro includes a feature called Ducking that automatically lowers music volume whenever dialogue is present. This creates balanced audio without requiring manual keyframe adjustments.
To use Ducking, assign the music track as Music inside the Essential Sound Panel and enable Ducking. Premiere Pro analyzes the dialogue and automatically reduces music volume during speech. This feature saves a huge amount of time and helps beginners create more professional mixes quickly.
Sound effects also play a huge role in cinematic editing. Simple sounds such as whooshes, impacts, clicks, transitions, footsteps, and ambient effects can dramatically improve video quality. Many cinematic edits feel empty without sound design because visuals alone often lack energy. Even subtle sound effects create immersion and improve emotional impact.
Premiere Pro allows editors to adjust sound effect loudness, stereo width, and timing easily. Professional editors often sync sound effects precisely with transitions, camera movements, and text animations because this creates smoother and more engaging edits. Music videos, gaming montages, and cinematic trailers depend heavily on strong sound design to maintain energy.
🎨 Music Balancing & Sound Design
Another useful beginner tool inside Premiere Pro is the Audio Track Mixer. While the Essential Sound Panel simplifies editing, the Track Mixer provides deeper control similar to professional audio software. Editors can adjust track levels, panning, effects, and equalization in real time. Beginners do not need to master advanced mixing immediately, but understanding basic track balancing helps improve audio quality significantly.
Equalization, often called EQ, is another important concept in audio editing. EQ controls different sound frequencies such as bass, mids, and treble. Voices usually sound clearer when unnecessary low frequencies are reduced slightly. Music may also require EQ adjustments depending on the style of the video. Many professionals use EQ carefully to create cleaner and more balanced sound.
Compression is another tool commonly used in professional editing. Compression reduces the difference between loud and quiet sounds, helping audio remain consistent. For example, if a speaker suddenly talks loudly in one section and softly in another, compression smooths the levels. Beginners should use light compression because excessive compression can make audio sound unnatural.
🔥 Creating Cinematic Audio Experience
Ambient sounds are often overlooked by beginners, but they add realism and atmosphere to videos. Rain sounds, city ambience, wind, crowd noise, room tone, and environmental sounds make scenes feel more alive. Without ambience, scenes can feel empty and unrealistic. Professional filmmakers and editors use ambient audio constantly to build cinematic atmosphere.
Another important skill is understanding audio transitions. Hard cuts between clips sometimes create noticeable pops or sudden changes in sound. Crossfades and audio transitions help smooth these changes naturally. Premiere Pro includes built-in transitions such as Constant Power and Exponential Fade that create cleaner audio movement between clips.
Monitoring audio levels is also extremely important. Premiere Pro includes audio meters that show volume levels in real time. Beginners should avoid clipping, which happens when audio becomes too loud and distorts. Keeping dialogue levels balanced and avoiding red peaks helps maintain professional sound quality.
Project organization becomes especially important in larger editing projects. Naming audio tracks properly, grouping music files, and labeling sound effects saves time and improves workflow efficiency. Many professionals organize projects carefully because cinematic edits often contain dozens of audio layers.
Performance optimization also matters when working with heavy audio effects. Low-end PCs may experience slower playback during complex edits. Rendering audio previews and reducing unnecessary effects during editing helps improve performance.
The most important thing beginners should remember is that professional sound design is usually subtle. Good audio supports visuals naturally instead of overpowering them. Clean dialogue, balanced music, cinematic ambience, and smooth sound effects together create immersive viewing experiences that feel polished and professional.
Adobe Premiere Pro’s Essential Sound Panel makes audio editing much easier for beginners while still providing powerful tools used in professional workflows. Whether you create YouTube tutorials, gaming edits, interviews, travel videos, cinematic reels, or advertisements,
strong audio quality can dramatically improve viewer engagement and overall production value. Once beginners understand dialogue cleanup, music balancing, sound effects, EQ, compression, ducking, and cinematic sound design workflow, they can create videos that sound far more professional and immersive. With regular practice, careful listening, and creative experimentation, even simple edits can achieve cinematic audio quality that makes content stand out beautifully on every platform.