
Adobe After Effects is one of the most powerful applications used for cinematic visual effects, motion graphics, and professional compositing. One feature that attracts almost every beginner editor is green screen editing because it allows creators to place subjects into completely different environments and create scenes that look impossible in real life. Whether it is a YouTuber standing in front of animated graphics, a gamer using a facecam overlay, a cinematic short film scene, or a superhero-style visual effect, green screen technology plays a huge role in modern video editing. Many people think chroma key editing is only used in Hollywood movies, but in reality, content creators on YouTube, Instagram, and other platforms use these techniques every day. In this part of the beginner course, we will learn how green screen editing works, how chroma key removes backgrounds, how to clean edges professionally, and how to replace backgrounds in a cinematic and realistic way.
The concept of green screen editing is actually very simple. A subject is recorded in front of a bright green background, and later that green color is removed digitally inside editing software. Green is commonly used because it is very different from natural human skin tones, making it easier for software to separate the subject from the background. Blue screens are also used sometimes in professional filmmaking, but green is more popular because modern cameras capture green very clearly and require less lighting.
Before opening After Effects, understanding recording quality is extremely important. Many beginners assume software alone creates perfect green screen effects, but lighting plays a massive role in the final result. Professional green screen footage is usually recorded with soft and even lighting across the entire background. If the background contains dark shadows, wrinkles, or uneven brightness, the chroma key process becomes much harder. Subjects should also stand slightly away from the green screen to avoid shadows and green reflections on skin or clothes.
🎬 Understanding Green Screen Workflow

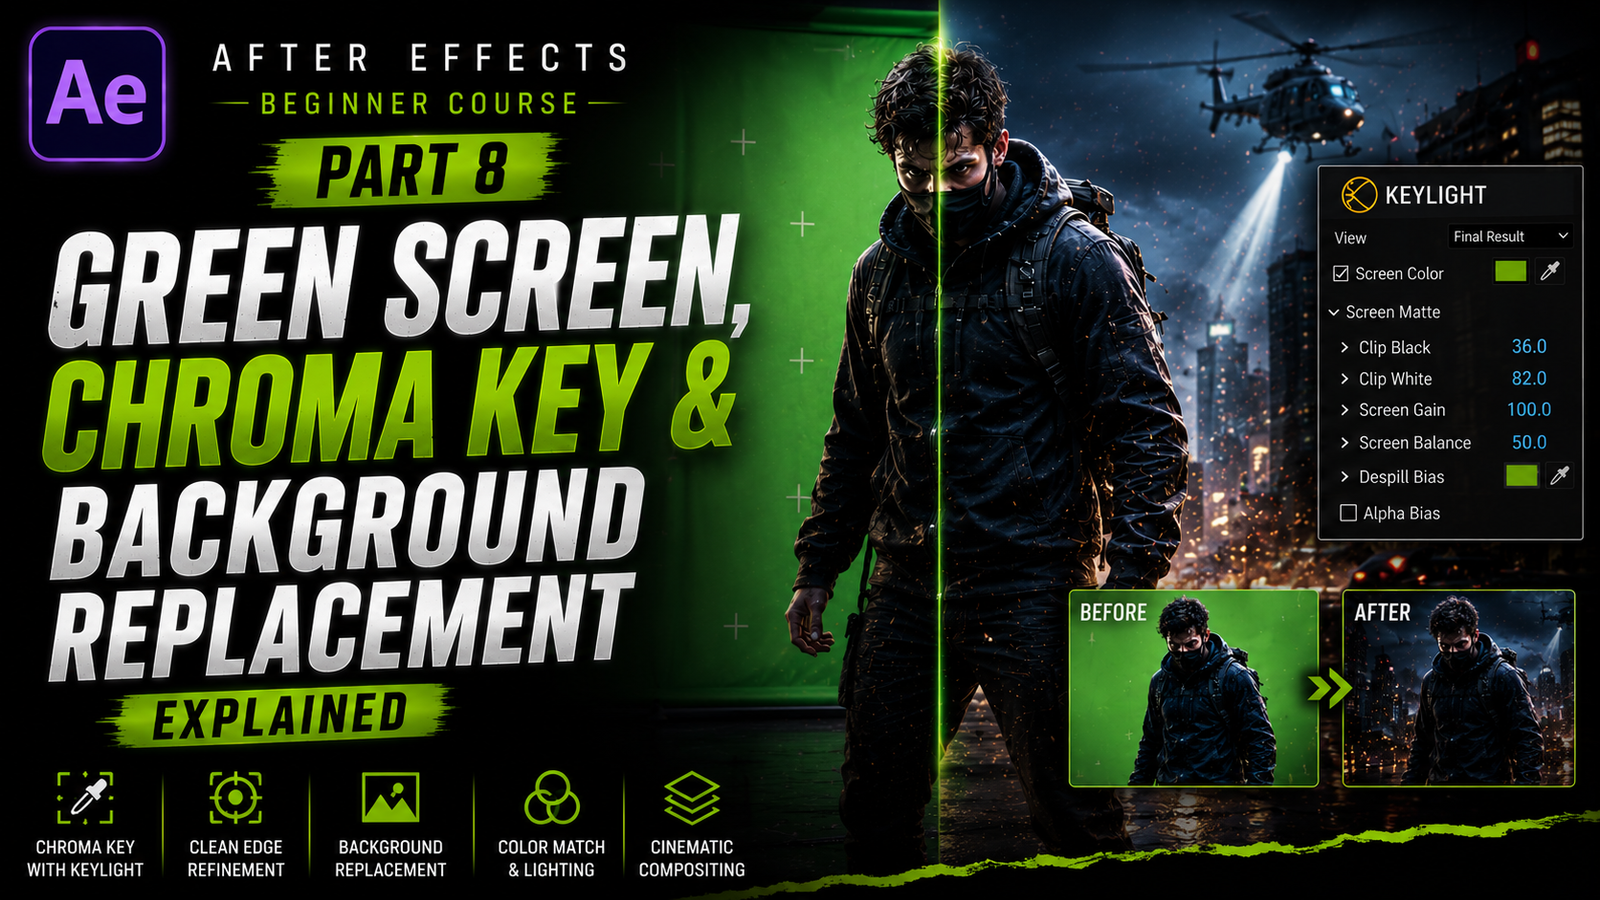
Once the footage is ready, import it into Adobe After Effects and create a new composition. Drag the video clip into the timeline. One of the most popular tools used for green screen editing inside After Effects is the Keylight effect. Keylight is widely used because it is powerful, beginner friendly, and capable of producing professional-quality chroma key results.
To apply Keylight, open the Effects & Presets panel and search for “Keylight.” Drag the effect directly onto the footage layer. Inside the effect controls, you will see a setting called Screen Color. This option tells After Effects which color should become transparent. Use the eyedropper tool and click on the green background in the footage. Instantly, the green background disappears, leaving only the subject visible.
At this stage, beginners are often excited because the basic background removal already works. However, professional chroma key editing requires additional cleanup because small imperfections usually remain. You may notice green edges around hair, transparency problems, or leftover shadows.
These issues are completely normal, especially with beginner footage.
Inside Keylight settings, the Screen Matte section becomes very important. This area controls transparency quality and edge cleanup. Two settings beginners should learn first are Clip Black and Clip White. Clip Black helps remove unwanted gray background areas, while Clip White restores important details in the subject. Small adjustments usually create the best results because aggressive values can damage edges and make the subject look unnatural.
⚡ Chroma Key Cleanup & Edge Refinement

Another common issue during green screen editing is green spill. Green spill happens when green light reflects from the background onto the subject, especially around hair, skin, or clothing edges. This creates unwanted green outlines that reduce realism. Keylight includes built-in spill suppression tools that help reduce these reflections automatically. Additional color correction effects such as Hue/Saturation can also reduce green tones manually if necessary.
One important thing beginners should remember is that perfect chroma key results depend heavily on source footage quality. Even professionals struggle with poorly lit or low-quality recordings. Instead of trying to remove every tiny imperfection aggressively, focus on creating balanced and natural-looking edges. Slight softness usually looks better than sharp artificial cutouts.
Once the background is removed properly, the next step is replacing it with a new environment. This process is called compositing. Import a new image or video and place it below the green screen footage layer in the timeline. Instantly, the subject appears inside the new environment. This is where creativity becomes exciting because the possibilities are endless. Subjects can appear inside futuristic cities, cinematic landscapes, gaming scenes, abstract motion graphics, or dramatic weather environments.
However, professional compositing is not only about placing a background behind a subject. Lighting, shadows, and colors must match to make the scene believable. For example, if the subject is lit with warm orange light but the background contains cold blue lighting, the result may look unrealistic. Professional editors spend significant time matching colors between subjects and environments because consistency creates realism.
🎨 Background Replacement & Color Matching

Color correction tools such as Curves, Exposure, and Lumetri Color help blend subjects naturally into new scenes. Small adjustments in brightness, contrast, and color temperature can dramatically improve realism. Adjustment layers are especially useful because they apply color effects across multiple layers at once, helping maintain a unified cinematic look.
Shadows are another important detail beginners often ignore. Without shadows, subjects may appear like floating stickers instead of realistic elements inside the environment. Adding subtle shadows under feet or around objects helps subjects feel grounded naturally within the scene. Motion blur also improves realism because fast-moving objects naturally create blur in real cameras.
Without motion blur, movement can feel stiff or artificial. Another useful technique is adding atmospheric elements such as smoke, dust, fog, particles, or light rays. These details help connect the subject and background together visually. Cinematic scenes often contain subtle environmental effects because they create depth and atmosphere. Even simple particle overlays can dramatically improve visual quality.
Green screen editing is not limited to Hollywood-style movies. YouTubers use it for tutorials, gamers use it for webcam overlays, educators use it for presentations, and content creators use it for cinematic reels and advertisements. Social media platforms are filled with creators using simple chroma key techniques to produce more engaging videos.
🔥 Professional Green Screen Workflow Tips
Project organization becomes very important in compositing work because green screen projects often contain multiple layers, adjustment layers, effects, audio tracks, and background assets. Naming layers properly and organizing assets into folders helps maintain a smooth workflow. Professional editors rely heavily on organization because larger projects can quickly become difficult to manage.
Performance optimization is also important because chroma key effects can slow down playback, especially on low-end PCs. Reducing preview resolution to Half or Quarter quality helps improve performance significantly. Clearing cache regularly and pre-rendering heavy compositions also makes editing smoother.
Another valuable beginner tip is practicing with different footage types. Some clips key very easily while others require detailed cleanup. Practicing with multiple lighting conditions and subject movements helps improve compositing skills over time. Patience is extremely important because green screen editing often requires experimentation and fine adjustments.
One of the best ways to improve cinematic compositing is by studying movies, advertisements, and high-quality YouTube edits. Observe how professionals use lighting, color, shadows, and atmosphere to blend subjects naturally into scenes.
Good compositing is usually subtle. The best visual effects often go unnoticed because they feel believable. Green screen editing and background replacement are some of the most powerful skills inside Adobe After Effects because they allow creators to transform ordinary footage into cinematic visual experiences.
These techniques are used every day in films, YouTube videos, gaming edits, advertisements, educational content, music videos, and modern social media projects. Once beginners understand Keylight, edge cleanup, spill suppression, color matching, shadows, and compositing workflow, they can create impressive scenes that look polished and professional. With consistent practice, patience, and creative experimentation, even simple green screen footage can become cinematic content that stands out beautifully on every platform.