
in this video I’m going to explain about premiere pro export settings you can understand easily read this article for more information
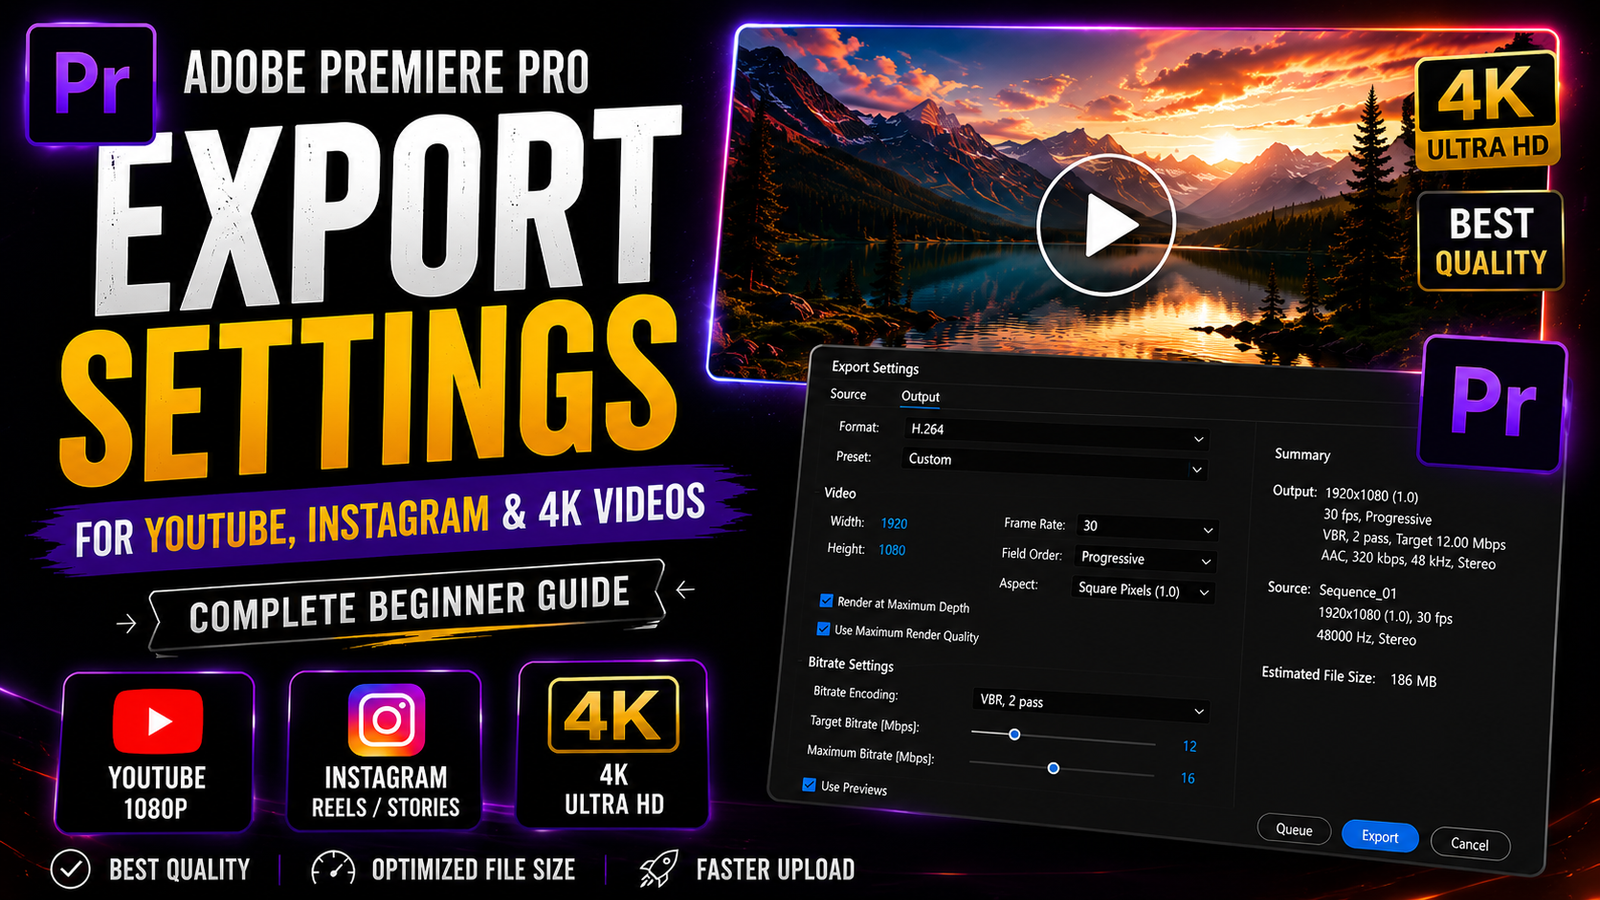
Export settings are one of the most important parts of video editing in Adobe Premiere Pro because they decide the final quality, file size, smoothness, and compatibility of your video across different platforms like YouTube, Instagram, Facebook, and other social media applications. Many beginners spend hours editing their videos perfectly but still get poor output quality because they use incorrect export settings. Understanding the correct export workflow can help you maintain high video quality while keeping the file size optimized and professional. After completing your editing process in Premiere Pro, the first step is to open the export window by selecting File, then Export, and finally Media. This opens the export settings panel where you can control all output settings for your final video. The most commonly used export format is H.264 because it provides excellent quality with smaller file sizes and is supported by almost all social media platforms. Once you select H.264, you will notice many presets already available in Premiere Pro such as YouTube 1080p Full HD, YouTube 4K, and Match Source High Bitrate. Beginners can start with these presets because they are optimized for common platforms and provide good quality automatically. However, learning manual settings gives you more control and helps you achieve better results based on your project requirements.
🎬 Premiere Pro Export Settings Panel

One of the most important settings is resolution. Your export resolution should match your sequence settings to avoid quality loss. For example, if your project is edited in 1920×1080 resolution, you should export using the same resolution. If you are editing vertical videos for Instagram Reels or YouTube Shorts, the recommended resolution is 1080×1920 with a 9:16 aspect ratio. For YouTube landscape videos, 1920×1080 with a 16:9 aspect ratio is the standard format. If you are working on cinematic or professional projects, you can also export in 4K resolution such as 3840×2160, but keep in mind that 4K videos require more storage and stronger hardware for smooth playback. Frame rate is another important setting that should match your original footage. If your footage was recorded at 30fps, export at 30fps. If your footage was recorded at 60fps for smooth motion or gaming videos, export at 60fps. Changing frame rates unnecessarily can create motion issues or unnatural movement in your final video.
⚡ Best Export Settings for YouTube & Instagram

Bitrate settings are extremely important because they directly affect video quality and file size. Bitrate controls how much data is used to encode your video. Higher bitrate gives better quality but increases file size, while lower bitrate reduces file size but can decrease video clarity. For most 1080p YouTube videos, a target bitrate between 8 Mbps and 16 Mbps provides excellent quality. For 4K videos, you can use 35 Mbps to 60 Mbps depending on your project. Premiere Pro provides two bitrate options called CBR and VBR. CBR means Constant Bitrate, while VBR means Variable Bitrate. Most editors prefer VBR 2-pass because it analyzes the video twice and produces better quality with optimized file size. This method takes slightly longer to export but gives more professional results. Audio settings are equally important because viewers often notice poor audio quality immediately. The recommended audio format is AAC with 48kHz sample rate and 320kbps bitrate for clean and clear sound quality
🎨 Bitrate & Quality Comparison

Another useful setting is Render at Maximum Depth, which improves color gradients and helps avoid color banding in your video. You can also enable Use Maximum Render Quality for better scaling results when resizing footage. However, enabling both options may increase export time, especially on low-end systems. Beginners using basic laptops can disable these options if export times become too long. If your timeline contains heavy effects, transitions, or color grading, it is recommended to render previews before exporting because this can reduce export issues and improve performance. Premiere Pro also allows exporting through Adobe Media Encoder, which is useful when exporting multiple videos at the same time because it works in the background while you continue editing other projects.
Final Export Workflow Example

Another important tip is checking your exported video before uploading it online. Sometimes compression or export mistakes can create issues like blurry visuals, missing audio, or color shifts. Always preview your final video completely before publishing. If your exported file size is too large, you can slightly reduce bitrate or use compression software without losing too much quality. Maintaining a balance between quality and file size is very important, especially for faster uploads and better viewer experience.
Beginners should start with basic presets and slowly learn advanced export settings with practice. Over time, you will understand how different settings affect quality, rendering speed, and performance. Adobe Premiere Pro provides all the necessary tools for creating professional exports, and mastering export settings is essential for every video editor. Whether you create YouTube videos, cinematic edits, Instagram reels, tutorials, gaming videos, or client projects, using the correct export settings will help you achieve clean, professional, and high-quality output that looks great on every platform.