
Adjustment layers in Adobe Premiere Pro are one of the most powerful and efficient tools for applying effects and color grading across multiple clips at once, making your workflow faster and more organized, especially when working on large projects. Many beginners apply effects individually to each clip, which takes a lot of time and can create inconsistency, but using adjustment layers allows you to apply changes to all clips below it in a single step.
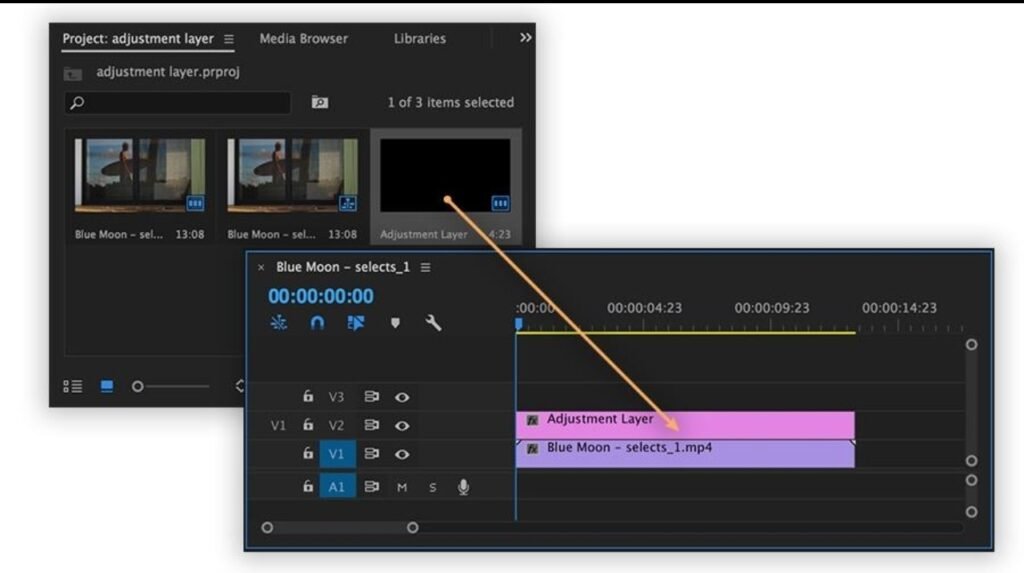
To start using adjustment layers, go to the Project Panel, click on the new item icon, and select Adjustment Layer. Once created, drag the adjustment layer onto the timeline and place it above the clips where you want to apply effects. Any effect you add to this layer will affect all clips beneath it. This is especially useful for color grading because you can maintain a consistent look across your entire video without adjusting each clip manually. For example, you can apply Lumetri Color to the adjustment layer and adjust exposure, contrast, highlights, shadows, and saturation to achieve a cinematic look. This ensures all clips have the same color tone, making your video look more professional.
🎬 Adjustment Layer Setup
Another advantage of adjustment layers is flexibility. You can easily turn effects on or off by enabling or disabling the adjustment layer, which helps in comparing before and after results. You can also trim the adjustment layer to apply effects only to specific parts of your timeline. For example, if you want a special color effect only for a particular scene, you can shorten the adjustment layer to cover only that section. This gives you full control over where and how effects are applied. Adjustment layers are not limited to color grading; you can also use them for adding blur, vignette, sharpening, or other creative effects. By stacking multiple adjustment layers, you can create complex effects while keeping your timeline clean and organized
🎨 Color Grading with Adjustment Layer
One of the most common uses of adjustment layers is creating cinematic color effects. You can apply basic correction first, such as fixing exposure and white balance, and then add creative color grading on top. Using color wheels, you can adjust shadows, midtones, and highlights to create a specific mood. For example, adding teal tones to shadows and warm tones to highlights creates a cinematic style often seen in movies. Adjustment layers make it easy to experiment with different looks without affecting your original clips. If you do not like a particular effect, you can simply remove or modify it without changing your base footage.
Effects Applied via Adjustment Layer Another useful feature is combining adjustment layers with masks. You can apply an effect on an adjustment layer and then create a mask to limit the effect to a specific area. For example, you can darken the background while keeping the subject bright, creating a spotlight effect. This technique is widely used in professional editing to draw attention to important elements. You can also animate masks using keyframes to create dynamic effects.