
Green screen editing, also known as chroma key editing, is one of the most powerful and creative features in Adobe Premiere Pro that allows you to replace the background of your video with any image or footage you want, making your content look more professional and visually engaging even if you are shooting in a simple environment. Many beginners think green screen editing is difficult, but in reality, it is very simple when you understand the basic steps and follow them carefully. First, you need a video that is recorded with a proper green background, and it is important that the lighting is even so that there are no shadows or dark spots on the green screen.
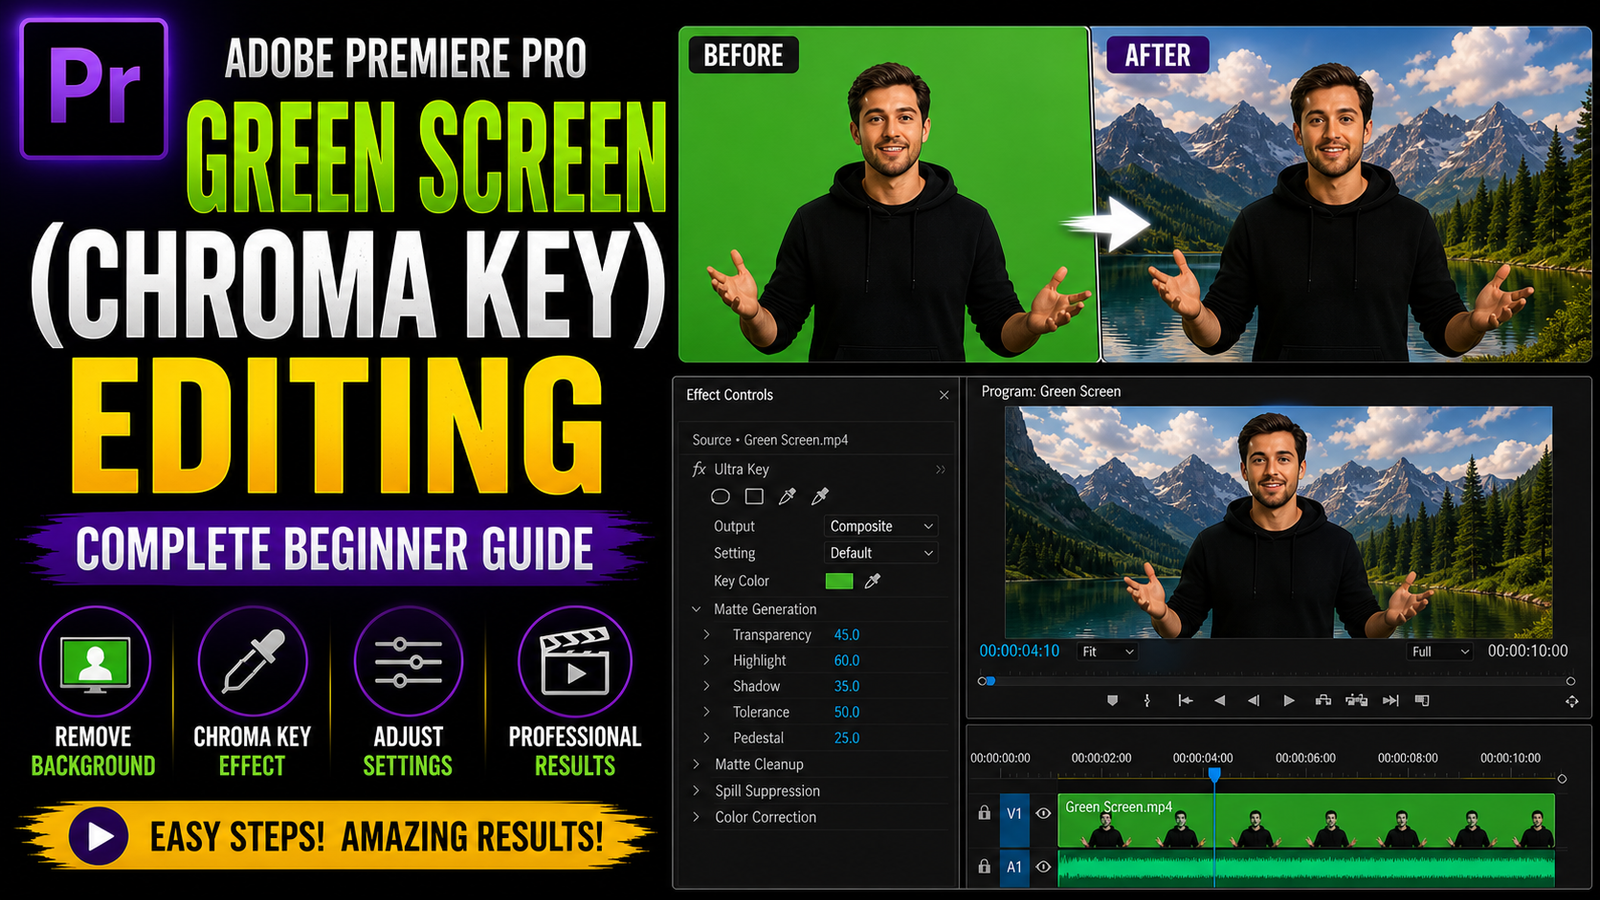
Once you import your video into Premiere Pro, place it on the timeline and add the background image or video on the track below it. This is important because the green area will be removed and replaced by the layer underneath. Now go to the Effects panel and search for the effect called Ultra Key, which is the main tool used for green screen editing in Premiere Pro. Drag and drop the Ultra Key effect onto your green screen clip, and then go to the Effect Controls panel. Here, you will see an option called Key Color. Use the eyedropper tool and click on the green background in your video
Immediately, you will notice that the green color disappears and your background layer becomes visible. This is the basic step, but to make it look professional, you need to fine-tune the settings. Adjust options like Matte Generation, Matte Cleanup, and Spill Suppression to remove any remaining green edges and improve the quality. Spend some time adjusting these settings because this is what makes the difference between a basic edit and a professional result.
🎬 Green Screen Setup Example

After applying the Ultra Key effect, the next step is to refine your edges and make the subject blend naturally with the background. Sometimes you may see green edges around the subject, which is called spill, and you can remove it using Spill Suppression settings. You can also adjust Shadow and Highlight to make the edges smoother. Another important step is color matching, because your subject and background should look like they belong together. If your background is bright and your subject is dark, it will look unrealistic. You can fix this by using color correction tools like Lumetri Color to match brightness, contrast, and temperature. This small step can greatly improve the overall look of your video. You can also add blur to the background slightly to create depth, which makes your video look more cinematic and focused.
🎨 Ultra Key Settings Panel

Another useful tip for green screen editing is adding shadows and light effects to match your scene. For example, if your background has sunlight from one side, you can add light effects to your subject to match that direction. This creates a realistic feel and avoids the “cut and paste” look that beginners often face. You can also use scale and position settings in Effect Controls to adjust your subject according to the background. Sometimes your subject may look too big or too small compared to the background, so resizing and repositioning is very important. Additionally, you can add motion to your background to make your video more dynamic. Static backgrounds can look boring, so adding slight zoom or movement can improve the visual appeal.
🔄 Before & After Green Screen Effect

Green screen editing is widely used in YouTube videos, interviews, tutorials, and even movies because it allows creators to produce high-quality content without needing expensive locations. Beginners should focus on getting clean green screen footage first because editing becomes much easier when the source video is good. Avoid wrinkles in the green cloth, ensure proper lighting, and maintain distance between subject and background to reduce shadows. These small details can save a lot of time during editing.
Practice is very important, so try different backgrounds and experiment with settings to understand how each option works. Over time, you will get better results and faster workflow. Even if your system is not very powerful, you can still learn green screen editing using basic settings and lower resolution previews. Premiere Pro provides all the tools needed to create professional chroma key effects, and mastering this feature can significantly improve your video quality and creativity.