
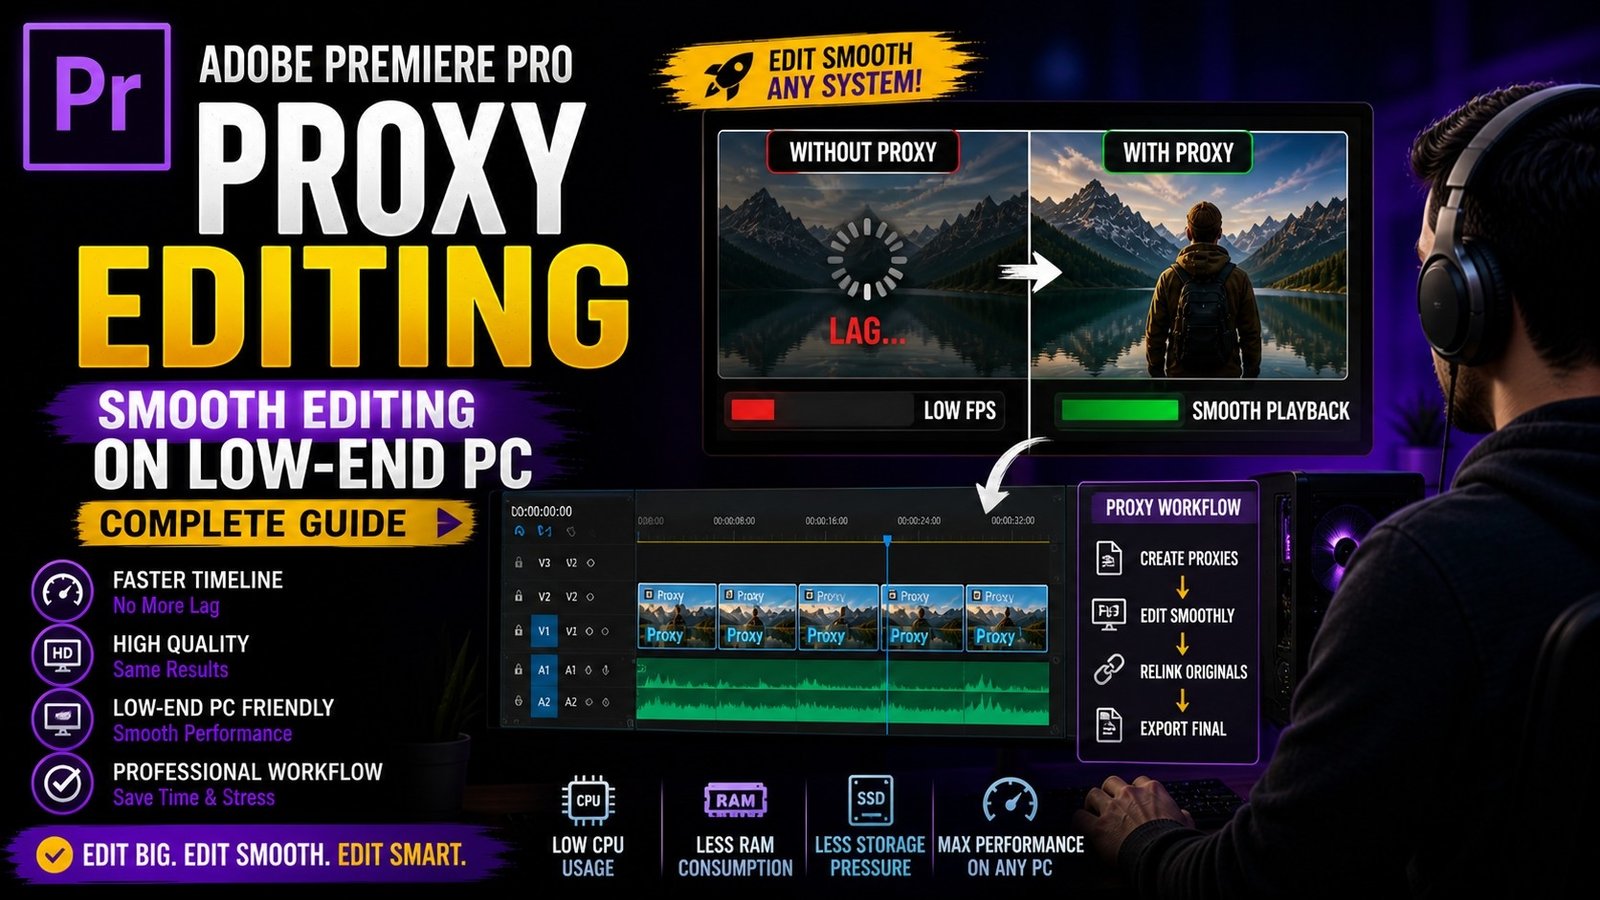
Proxy editing in Adobe Premiere Pro is one of the most useful features for beginners and professionals who work on low-end systems or handle heavy high-resolution footage like 4K and 6K videos, because it allows you to edit smoothly without lag while maintaining the original quality for final export. Many beginners face performance issues such as lagging timeline, slow playback, or system crashes when editing high-quality videos, and this is where proxy workflow becomes very helpful. Proxy files are low-resolution versions of your original clips that are easier for your system to process, and Premiere Pro automatically switches between proxy and original files during editing and exporting.
To start using proxy editing, you first need to import your media into the Project Panel, then select the clips, right-click, and choose the option “Create Proxies.” After selecting this, Premiere Pro will open Adobe Media Encoder, where you can choose a proxy preset such as low-resolution H.264 or QuickTime format. Once you start the process, Media Encoder creates proxy files for your clips, and these files are linked automatically in Premiere Pro.
After proxies are created, you need to enable the proxy toggle button in the Program Monitor, which allows you to switch between proxy and original footage easily. When the proxy is enabled, your system will use the lightweight files, making playback and editing smooth even on basic laptops or PCs. One of the biggest advantages of proxy editing is that it does not affect your final output quality, because Premiere Pro uses the original high-quality files during export. This means you get smooth editing performance without compromising quality.
🎬 Proxy Workflow Setup

After setting up proxies, you can continue editing your project normally, including cutting clips, adding transitions, effects, and color grading. The editing process remains the same, but performance becomes much better. This is especially useful when working with multiple layers, effects, or high-resolution footage. Another important tip is to keep your proxy files organized in a separate folder so that they are easy to manage and relink if needed. Premiere Pro automatically links proxy files, but if you move them, you may need to relink manually. Keeping a clean folder structure helps avoid confusion. You can also customize proxy settings based on your system performance. For example, if your system is very slow, you can choose lower resolution proxies like 720p, and if your system is slightly better, you can use 1080p proxies. Choosing the right proxy resolution helps balance performance and preview quality.
⚙️ Proxy Toggle & Timeline Performance

Another useful feature in proxy editing is the ability to apply effects and color grading without lag. Normally, applying heavy effects can slow down your system, but with proxies, you can preview changes more smoothly. However, keep in mind that some effects may look slightly different in proxy mode due to lower resolution, so always check your final output using original files before exporting. Proxy editing is also very helpful when working on large projects with multiple clips, as it reduces system load and improves overall workflow efficiency.
🎨 Editing with Effects Using Proxies

Another advantage of proxy workflow is stability. Many beginners face crashes when editing heavy files, but using proxies reduces the load on your system and minimizes crashes, making your editing experience more reliable. This is especially important when working on long projects or tight deadlines. Proxy editing also allows you to multitask, as your system resources are not heavily used, so you can run other applications while editing. This improves productivity and saves time. It is also important to remember to disable proxy mode when reviewing your final edit to ensure everything looks perfect in full quality. Premiere Pro automatically uses original files during export, so you do not need to worry about switching manually.
⚡ Final Output (Original Quality Export)

Proxy editing is widely used by professional editors because it improves speed, efficiency, and workflow, especially when working with high-resolution footage. Beginners should learn this feature early because it solves many common performance problems and makes editing more enjoyable. Even if you have a powerful system, proxy workflow can still help in managing large projects efficiently. Practice using proxies with different types of footage and understand how it affects performance. Over time, you will develop a faster and smoother editing workflow. Premiere Pro provides all the tools needed for proxy editing, and mastering this feature will help you edit videos without lag, reduce crashes, and improve productivity.